07. Localization: AMCL Package
AMCL
You learned about Monte Carlo Localization (MCL) in great detail in a previous lesson. Adaptive Monte Carlo Localization (AMCL) dynamically adjusts the number of particles over a period of time, as the robot navigates around in a map. This adaptive process offers a significant computational advantage over MCL.
The ROS amcl package implements this variant and you will integrate this package with your robot to localize it inside the provided map.
We will start by creating a new launch file.
$ cd /home/workspace/catkin_ws/src/udacity_bot/launch/
$ nano amcl.launch
This launch file has three nodes, one of which is for the amcl package. Copy the following into your launch file.
<?xml version="1.0"?>
<launch>

  <!-- Map server -->
  <arg name="map_file" default="$(find udacity_bot)/maps/jackal_race.yaml"/>
  <node name="map_server" pkg="map_server" type="map_server" args="$(arg map_file)" />

  <!-- Localization-->
  <node pkg="amcl" type="amcl" name="amcl" output="screen">
    <remap from="scan" to="udacity_bot/laser/scan"/>
    <param name="odom_frame_id" value="odom"/>
    <param name="odom_model_type" value="diff-corrected"/>
    <param name="base_frame_id" value="robot_footprint"/>
    <param name="global_frame_id" value="map"/>
  </node>
You will first load the provided map using a new node for the map_server package. Previously, the robot_state_publisher helped built out the entire tf tree of your robot based on the URDF file. But it didn't extend that tree by linking in the 'map' frame. The amcl package does that automatically by linking the 'map' and 'odom' frames.
You will then add a node that will launch the amcl package. The package has its own set of parameters that define its behavior in RViz and how everything relates to your robot and the provided map so that the robot can effectively localize itself. Some of those parameters have been provided to you as a starting point. The amcl package relies entirely on the robot’s odometry and the laser scan data.
You first remap the scan topic to the udacity_bot/laser/scan topic on which your hokuyo sensor publishes the sensor data. You defined this topic when adding the gazebo plugin for the sensor. Then, you add parameters and define values for the different reference frames such as the odom or the map frames. The amcl package will now be able to take in the laser and odom data, and localize the robot!
However, the robot is still stationary. How will it navigate to any position to collect more information from its surroundings?
That’s where the ROS Navigation Stack comes in!
Navigation Stack
You will be working with the move_base package using which you can define a goal position for your robot in the map, and the robot will navigate to that goal position.
The move_base package is a very powerful tool. It utilizes a costmap - where each part of the map is divided into which area is occupied, like walls or obstacles, and which area is unoccupied. As the robot moves around, a local costmap, in relation to the global costmap, keeps getting updated allowing the package to define a continuous path for the robot to move along.
What makes this package more remarkable is that it has some built-in corrective behaviors or maneuvers. Based on specific conditions, like detecting a particular obstacle or if the robot is stuck, it will navigate the robot around the obstacle or rotate the robot till it finds a clear path ahead.
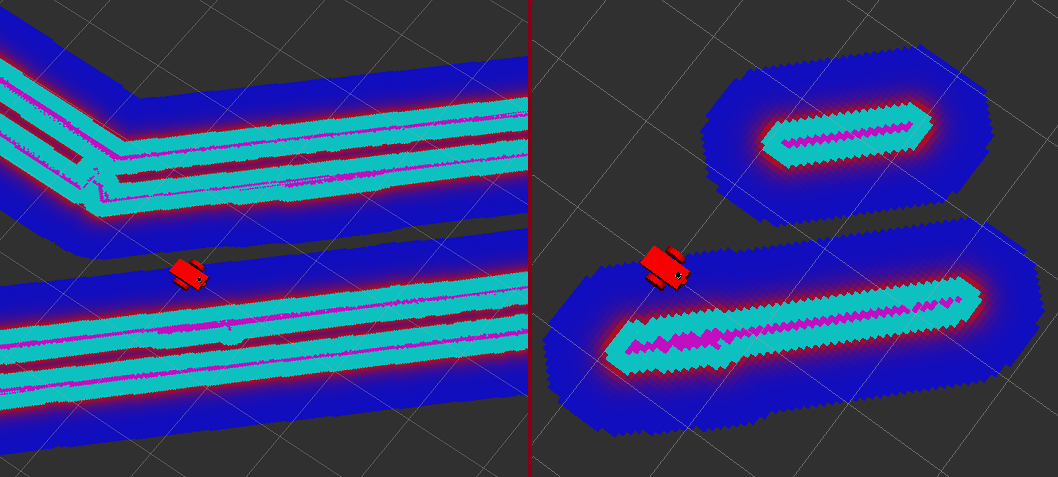
In the image below, you can see both the costmaps with a particular color scheme. On the left, we have the global costmap displaying all the occupied areas based on the provided map. And on the right, we have the local costmap of the same region. The local costmap is only displaying what the laser sensor captures during that time period.
In the same launch file as above, copy the following code.
<!-- Move base -->
  <node pkg="move_base" type="move_base" respawn="false" name="move_base" output="screen">
    <rosparam file="$(find udacity_bot)/config/costmap_common_params.yaml" command="load" ns="global_costmap" />
    <rosparam file="$(find udacity_bot)/config/costmap_common_params.yaml" command="load" ns="local_costmap" />
    <rosparam file="$(find udacity_bot)/config/local_costmap_params.yaml" command="load" />
    <rosparam file="$(find udacity_bot)/config/global_costmap_params.yaml" command="load" />
    <rosparam file="$(find udacity_bot)/config/base_local_planner_params.yaml" command="load" />

    <remap from="cmd_vel" to="cmd_vel"/>
    <remap from="odom" to="odom"/>
    <remap from="scan" to="udacity_bot/laser/scan"/>

    <param name="base_global_planner" type="string" value="navfn/NavfnROS" />
    <param name="base_local_planner" value="base_local_planner/TrajectoryPlannerROS"/>

  </node>


</launch>
Just like the amcl, or any other package, move_base also has its own set of required parameters that help it perform efficiently. You remap specific topics to allow them to take in input from odometry or laser data, and also define some configuration files for parameters or definitions pertaining to the costmaps as well as the local planner that creates a path and navigates the robot along that path.
Let’s add those configuration files first.
$ cd ..
$ mkdir config
$ cd config
From the repo, copy the following files and add them here in config:
local_costmap_params.yamlglobal_costmap_params.yamlcostmap_common_params.yamlbase_local_planner_params.yaml
The above files already have some set of parameters and some values defined for you to help you get started.
Launch Setup
You have your robot, your map, your localization and navigation nodes. Let’s launch it all and test it!
$ cd /home/workspace/catkin_ws/
$ roslaunch udacity_bot udacity_world.launch
In a new terminal,
$ roslaunch udacity_bot amcl.launchAs you did in a previous section, setup your RViz by adding the necessary displays and selecting the required topics to visualize the robot and also the map.
In Rviz,
- Select “odom” for fixed frame
- Click the “Add” button and
- add “RobotModel”
- add “Map” and select first topic/map
- The second and third topics in the list will show the global costmap, and the local costmap. Both can be helpful to tune your parameters.
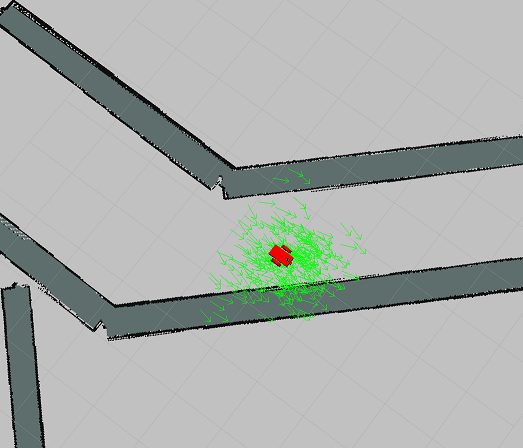
- add “PoseArray” and select topic /particlecloud
- This will display a set of arrows around the robot.
Note: As you discovered in the EKF lab, you can save the above RViz setup in a configuration file and launch RViz with the same configuration every time. This will make the process more efficient for you!
Each arrow is essentially a particle defining the pose of the robot that your localization package created. Your goal is to add/tune the parameters that will help localize your robot better and thereby improve the pose array.
In RViz, in the toolbar,
- Select “2D Nav Goal” click anywhere else on the map and drag from there to define the goal position along with the orientation of the robot at the goal position.
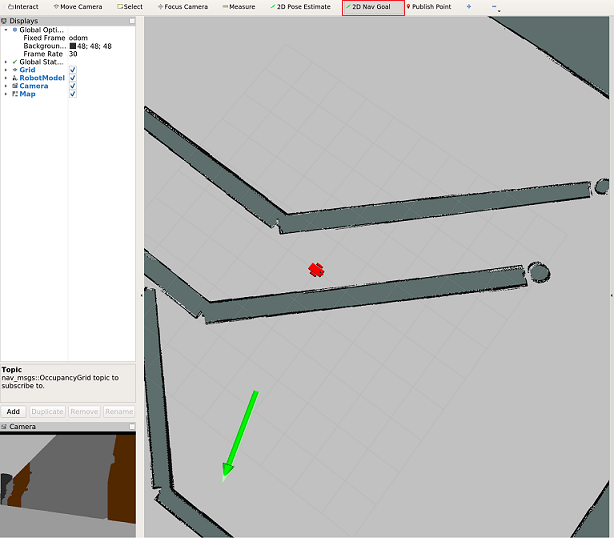
Your robot should start moving towards your defined goal position!

Whoa! Those warnings don't look good.
The amcl.launch file is throwing a lot of warnings, your map in RViz might be flickering, your robot might not be moving too well or at all etc.
All of these are expected. We have provided you with a template for launching the necessary nodes and packages. However, it is up to you to explore some of the important parameters and tune them to effectively navigate and accurately localize the robot in this map.
In the next section, we will cover some of the parameters that have been provided to you and some that you can consider to get started!